January kicked off my office renovation project that has me soooo excited. In September 2018 we flipped our house in FL and bought a 10 acre “homestead" in rural NC near Asheville. It is SO beautiful here and we absolutely love it, but we have a long list of work to do on the home and workshops! Today I’m going to show you a little peek as to what has been going on behind the scenes.
The Words By Heart office and workshop reside in our 1,000+ square foot basement, which has been fantastic. The basement isn’t totally finished, but it isn’t one of those damp creepy ones either. It kind of has a warehouse feel to it. It needs some work but it gives us plenty of room to continue to grow. It is separated into a few different parts - My “office” is a separate room off to one end with a door. This is where I do all of my stamping, and where I keep my paperwork desk with computer. It has a big beautiful window that is taller than me and lets in so much beautiful natural light. From the window I can see the deer that come and eat corn we put out about 20 feet away from the window. Beyond that is acres and acres of quiet woodland. Off to the right I can catch a glimpse of our 2 Pot belly pigs that live outside. It's perfect and I love it.
Outside of my room in the other part of the basement is where Seth does all of the metal work and fabrication, and at the far end is our packaging station with shelves for boxes, bows, labels, and so on.
I’m kicking myself for not taking any proper “before” photos, but here is a small glimpse at my stamping desk. Shelves held up by cinderblocks on top of my folding desk from Home Depot. I had two of these desks running nearly the entire length of this wall. To the right is the large window I mentioned, and on the wall behind me, next to the door, is where my computer desk was.
And then there is Brinkley, one of our 3 dogs. 🤨

My vision was to "Fixer Upper” my office to 1. Make it more functional, and 2. Make it a place where I could do more videos and behind the scenes footage.
My design includes Shiplap walls, a finished ceiling, faux stained beams, a new floor, and permanent butchers block countertop that runs around the entire room, at standing desk height. This way I can do less sitting, more standing, but still sit at a stool if I need to. Getting fitter is a big New Years Resolution for me and being less sedentary is a start!
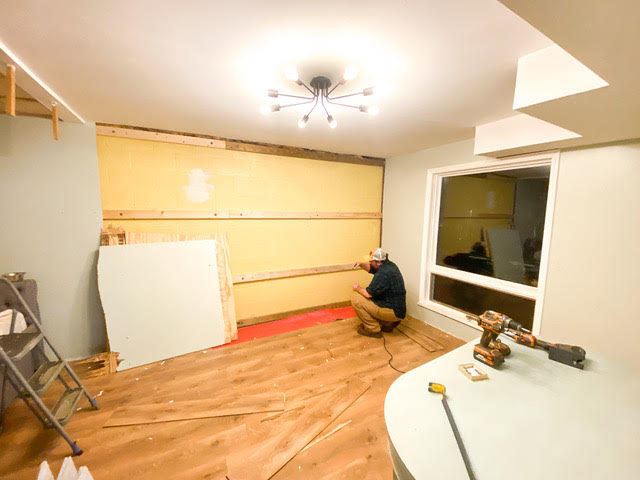
So for reference in this photo, I was sitting just to the left of where Seth is.
Notice the random pieces of wood sticking vertically down from the ceiling. We still have no idea what those were from.
The first step was taking the plywood off the walls. The reason we couldn’t just shiplap over this was because the wall was hollow behind the plywood due to the horizontal 2x4s the previous owner put up. Since shiplap also runs horizontal, we would not have had enough to tack them into. Also I wouldn’t have been able to hang shelves on the wall or my butchers block benches. We had to strip this all off, and the 2x4s, and then put plywood back up without the 2x4s in between. The yellow color is an external block wall.
Anyone ever read the book, “If you Give a Mouse a Cookie”? If not, it is a cute children’s book about how one thing inevitably always leads to the next and that is what happened here. We weren’t planning on it, but the whole wall and ceiling came down, reframed, and put back up. Its a long story! In this step, let's just say we learned a lot of hard lessons.
Once we finally got past that step we put all of the new plywood back up, drilled it into the concrete block, and primed it.
Prep is everything! Once we removed everything from the room, we painted the walls white so that in between the shiplap cracks it would be the same color.

Ceiling is up! This step was SO hard. Holding a wobbly 8ft sheet of wainscoting while up on a ladder and trying to get it perfectly straight is not for the faint of heart. If you want to test your marriage, I highly recommend a DIY project 🤣. Just kidding, we had fun - most of the time!
Our ceiling was very very uneven, as you can see in some of the early pics, so this and some well placed faux beams will help hide some of the bulges. We chose the primed sheets versus raw because at this point any steps we can save are a big help. Now we need to fill cracks and holes and roll it with paint.
This is the part I’d been waiting for - SHIPLAP!! Since we had a strict budget for this project we went the faux shiplap route - which is cutting 6” strips from 1/4” underlayment plywood. It is super smooth and you can somewhat easily rip pieces from it on a table saw yourself. Sheets are only $13 each so the whole room of shiplap only cost $182.


Floors are in! I actually installed them myself - they are my favorite part of home renovations because you can see the results so quickly.
In this pic you can also see the Nail holes in the new wainscoting ceiling being filled. Next step - finish Shiplap on two walls and then paint everything white!
It feels good to see some progress but what I really can’t wait for are the next steps. Painting the shiplap, putting in the baseboards and moulding, and hanging my butcher’s block bench!
It has been a month since I’ve been able to work in my office and I’m missing it so so much. In the meantime, we are still stamping and fabricating, just all out in the main basement area. Here’s to hoping that next month I will have the finished “After” pics for you all!
Are you working on any home renovation projects? I’d love to hear about it!
Temporary workspace


Daryl
March 23, 2024
I love everything about this. Especially the pup in the chair with you. ❤️. I’m so jealous you have this space at home. I rent space and would rather be home in my pjs doing what I love.
See you soon. ❤️